C++ Scripts
As you alreay should know LayoutEditor C++ Macros are the build in scripting interface of the LayoutEditor. Within the LayoutEditor macros can be recorded, execute, edited and embedded in main menu/tools bar of the graphical user interface. Beside this very comfortable features macros can also be called from the command line. To call a macro use `layout macro-file-name design-filename'. The macro will be executed on the design and the result is stored without showing up the normal user interface.
Macro Structure
Macros are normal text files starting with a special header. The header must look like:
#!/usr/bin/layout
#codec=UTF-8
#name=your_macro_name
#help=help_for_your_macro
#shortcut=CTRL+Z
The line 2 (#codec...) is optional and only required, if you use non AscII characters. A UTF-8 encoding is used in the case no coding is defined. Line 5 is also optional and will set the short cut key to trigger the macro. It will be effective only, if the macro is added to the menu. The short cut must not be used by a build in features (or removed by a auto start macro).
The main-function in the macro is executed. If a exitcode unequal 0 is returned, a warning is display. All called functions had to be defined before the main function.
int main(){
...
}
Most of the drawing relevant classes can be accessed via the class layout. The layer information is accessed via the class layer, the general setup via the class setup and the schematic window via the class schematic.
Data Structure
The data stucture in the LayoutEditor is keep simple. A short overview is given here. More detailed information can be found for each class. The scripting is object orientated using a couple of classes and extensive use of pointers.

Layout Window Structure
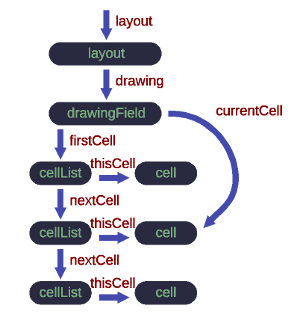
In any variant of scripting you will get a pointer with the name layout on the class layout. The class layout is the main window in the LayoutEditor. With methods in this class you can adjust the graphical user interface or call common dialog e.g for requesting a new file name. It also contains a pointer with the name drawing to the class drawingField. This class stores the design data and gives a high level access to manipulate the data. Also methods for loading and saveing are avaiable. The class drawingField has a pointer 'currentCell' to the current displayed cell and a pointer firstCell to a list of all cells in the design.
Cell Data Structure
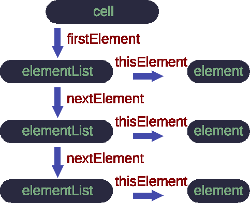
The class cell stores data belonging to a single cell likes the cell name. It has a plenty of methods for a mid level modification of the cell elements e.g. selecting elements in a defined region or moving all selected shapes. The class cell includes a list of all elements in the cell. Each single element of the design which can be one of the four basic shapes (path, box, polygon or text) or a reference (cell reference or cell reference array) is store in the class element. Via method of the class element a low level access to any data is possible e.g. selecting that element or setting the vertexes.
Examples
Any LayoutEditor package contains under macros/examples a folder with a large number of examples. Here are some basic examples to get started:
#!/usr/bin/layout
#name=#1: Syntax
#help=Helptext for Sample 1

int main(){

 // This is a comment

 /* This is
 a multiline
 Comment
 */

 // possible typ
 int i;
 i=6;

 bool b;
 b=true;

 double d;
 d=6.2345;

 string s;
 s= "This is a test!\n";

 point p;
 p.setX(1000);
 p.setY(900);

 pointArray pa;
 pa.resize(1);
 pa.setPoint(0,p);

 // if command
 if (i==6) s+="i is equal to 6";
 else d+=i;

 // for loop
 int k;
 for (k=1; k<=3 ; k++){
    i+=k;
 }

 // while loop
 while (k<5){
    k++;
 }

 // do {} while loop
 do {
    k++;
 }while (k<10);

 return 0;
}
!/usr/bin/layout
#name=#2: Layers
#help=Handling of layers
int main(){
layers::num[10].visible=false;
int i;
i = 6;
string s="Layer ";
string layerNum6=layers::num[i].name;
layers::num[i].name= s+i;
int k;
k=layers::findLayer("Layer 6");
layers::num[k].name= layerNum6;
for (k=1; k<=3 ; k++){
layers::num[k+1].visible=false;
}
layers::num[1].setColor(255,100,0);
layers::num[1].setStyle(5);
return 0;
}#!/usr/bin/layout
#name=#3: Dialog
#help=User Dialog;
int main() {
string s=layout->getText("Hallo","Bitte Text eingeben:","test");
int i=layout->getInteger("Hallo","Bitte Int eingeben:", 3 );
double d=layout->getDouble("Hallo","Bitte double eingeben:", 4.6 );
layout->showMessage("Hallo",s+(i/d));
}
#!/usr/bin/layout
#name=#4: Cells
#help=duplicate current cell

int main() {

 // get current Cellname and add "_copy"
 string cellname=layout->drawing->currentCell->cellName+"_copy";

 // get pointer to current cell
 cell *cellToCopy=layout->drawing->currentCell;

 // add new empty cell
 cellList *cl=layout->drawing->addCell();

 // set new cellname
 cl->thisCell->cellName = cellname;

 // set new cell to current cell
 layout->drawing->setCell(cellname);

 // add cellref to orginal cell
 point p;
 p.setX(0);
 p.setY(0);
 element *e=cl->thisCell->addCellref(cellToCopy,p);

 // flat celref
 cl->thisCell->selectAll();
 cl->thisCell->flatSelect();

 // adjust scalling
 layout->drawing->scaleFull();

}
#!/usr/bin/layout
#name=#5: Elements
#help=sets the size of text with negative width to -10 and round paths to a grid of 1000

int main() {
 // get first cell
 cellList *cells=layout->drawing->firstCell;

 // loop over all cells
 while (cells!=NULL){
 if (cells->thisCell!=NULL){
 // get first Element of this cell
 elementList *l=cells->thisCell->firstElement;
 cells->thisCell->deselectAll();

 // loop over all elements
 while (l!=NULL) {
 if (l->thisElement!=NULL) {
        // if element is a path with a width less than 0
 if ( l->thisElement->isPath() ){

         // setWidth to zero
 //l->thisElement->setWidth(0);

         /* to set to userunits use:
         l->thisElement->setWidth(60/layout->drawing->userunits);
         */

 // select this element
         l->thisElement->selectAll();
 }
 if ((l->thisElement->getWidth()< 0) &&
 l->thisElement->isText() ){
            l->thisElement->setWidth(-10);
            }
 }
 l=l->nextElement;
 }

 //round all selected elements
 cells->thisCell->roundSelect(1000);
 cells->thisCell->deselectAll();
 }
 cells=cells->nextCell;
 }
}
#!/usr/bin/layout
#name=#6: File I/O
#help=write all polygons on layer 23 in a file

int main() {
 file f;

 // add platform spezific path like "/home/username/filename" or "c:/my Files/filename.txt"
 string s="poly_on_23.txt";
 f.filename=s;
 bool b=false;

 //open for output
 f.open(b);

 s="";
 point p;
 string s1,s2,s3;
 int r;

 // loop over all cels
 cellList *cells=layout->drawing->firstCell;
 while (cells!=NULL){
 if (cells->thisCell!=NULL){
 elementList *l=cells->thisCell->firstElement;

 // loop over all elements
 while (l!=NULL) {
     if (l->thisElement!=NULL) {
 if (l->thisElement->layerNum==23){
        if ( l->thisElement->isPolygon() ) {
            pointArray pa=l->thisElement->getPoints();
            int i;
            s3.setNum(pa.size());
            s+="Polygon ("+s3+"):";
            for (i=0; i<pa.size(); i++){
                p=pa.point(i);
                s1.setNum(p.x());
                s2.setNum(p.y());
                s+="("+s1+","+s2+") ";
                }
            s+="\n";
            }
        }}
     l=l->nextElement;
    }
 }
 cells=cells->nextCell;
 }

 // write string
 f.write(s);

 // close file
 f.close();
}
© 2026 juspertor GmbH